Saturday, November 26, 2016

Final Presentation

All pictures were shot with a Canon EOS Rebel T3i digital SLR camera. No flash was used in any of the pictures.


Lens: 75-300 mm
Focal Length: 300 mm
ISO: 100
Av: f/5.6
Tv: 1/320 sec

Lens: 75-300 mm
Focal Length: 290 mm
ISO: 100
Av: f/5.6
Tv: 1/400 sec

Lens: 75-300 mm
Focal Length: 300 mm
ISO: 100
Av: f/5.6
Tv: 1/160 sec

Lens: 75-300 mm
Focal Length: 300 mm
ISO: 100
Av: f/5.6
Tv: 1/125 sec

Lens: 75-300 mm
Focal Length: 300 mm
ISO: 100
Av: f/5.6
Tv: 1/250 sec

Lens: 75-300 mm
Focal Length:
ISO: 100
Av: 300 mm
Tv: 1/250 sec

Lens: 75-300 mm
Focal Length: 300 mm
ISO: 100
Av: f/5.6
Tv: 1/400 sec

Lens: 75-300 mm
Focal Length: 300 mm
ISO: 100
Av: f/5.6
Tv: 1/400 sec

Lens: 18-55 mm
Focal Length: 39 mm
ISO: 100
Av: f/22
Tv: 1/20 sec

Lens: 18-55 mm
Focal Length: 18 mm
ISO: 100
Av: f/22
Tv: 1/20 sec

Lens: 18-55 mm
Focal Length: 18 mm
ISO: 100
Av: f/22
Tv: 1/30 sec

Lens: 18-55 mm
Focal Length: 18 mm
ISO: 100
Av: f/22
Tv: 1/30 sec

Lens: 18-55 mm
Focal Length: 39 mm
ISO: 100
Av: f/32
Tv: 2.0 sec


Lens: 75-300 mm
Focal Length: 300 mm
ISO: 200
Av: f/5.6
Tv: 1/100 sec

Lens: 18-55mm
Focal Length: 55mm
ISO: 100
Av: f/13
Tv: 1/25 sec

Lens: 75-300 mm
Focal Length: 270 mm
ISO: 100
Av: f/5.6
Tv: 1/2000 sec

Lens: 18-55 mm
Focal Length: 18 mm
ISO: 100
Av: f/8.0
Tv: 1/50 sec

Lens: 18-55 mm
Focal Length: 18 mm
ISO: 100
Av: f/22
Tv: 1/40 sec

Lens: 18-55 mm
Focal Length: 55 mm
ISO: 100
Av: f/22
Tv: 1/30 sec

Lens: 75-300 mm
Focal Length: 300 mm
ISO: 100
Av: f/6.3
Tv: 1/50 sec

Lens: 18-55 mm
Focal Length: 23 mm
ISO: 100
Av: f/22
Tv: 15.0 sec

Lens: 18-55 mm
Focal Length: 18 mm
ISO: 100
Av: f/22
Tv: 1/8 sec

Lens: 18-55 mm
Focal Length: 20 mm
ISO: 100
Av: f/22
Tv: 0.3 sec

Lens: 18-55 mm
Focal Length: 42 mm
ISO: 100
Av: f/22
Tv: 0.3 sec

Lens: 75-300 mm
Focal Length: 105 mm
ISO: 200
Av: f/4.5
Tv: 1/200 sec


Thursday, November 17, 2016

Thursday Blog


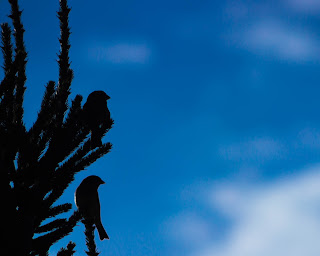
This is the same picture I used for my final share 2. However, I tried to incorporate the changes that were suggested. First, I cropped the picture more to put the focus more on the birds. I then increased the shadows to give the birds more of a silhouette feel. I also decreased the green saturation on the tree to get rid of any green detail that might still be coming through. Finally, I decreased the temp of the picture to give the sky a darker blue color.

Tuesday, November 15, 2016

Final Share 2 and Critique

ISO 100
f/5.6
1/250s

ISO 100
f/5.6
1/2000s

This is my final share 2 and critique. The first picture is of a small hawk or falcon that was in my back yard. The only editing I have done so far was to get rid of some shadows and I also applied my general settings. The second was also taken in my back yard. At first, I didn't like the picture because not a lot of detail could be seen in the birds. However, I began to like it since the shadows give the picture a silhouette feel.  

Thursday, November 10, 2016

Another Picture of the Moose


This is another picture of the moose I saw last Saturday. I liked how she just laid down while I was less than 100 feet from her. I didn't have to crop this picture much, as I made sure to frame it right while I was shooting her. She seems so calm and completely disregarded the fact that I was there. I wish the pine trees weren't in the shot, but I don't think they distract from the picture too much since they are on the peripheries of the picture. The only edits I did was apply my preset, crop the picture slightly, and then added a graduated filter to the corners and then lowered the exposure. I think this does a good job at getting the viewer to linger over the moose for a few more seconds before wandering over to where the moose is looking.

Tuesday, November 8, 2016

Share 2 and Critique #2

 ISO 100
f/22
0.3 sec
ISO 200
f/4.4
1/200 sec

Both of these picture were taken last Saturday up by Red Lodge near the West Fork Trailhead. The first picture is a small waterfall along the trail. I was really excited since I was able to mess with the shutter speed to give the water a ribbon-like look to it. The second picture is of a moose looking at a second moose, which is out of the frame to the right. According to Dave (who I saw on the trail while taking this picture), these two moose have been in the area for about 4 months now. They were right next to the trail and didn't mind at all that I was hanging out taking pictures of them. I am sure they are very used to hikers by now. 

Thursday, November 3, 2016

Foggy Morning in the Park

ISO 100
f/22
0.3 sec

This picture was taken last Sunday morning in Pioneer Park. It was an especially foggy morning, which made for some pretty incredible pictures! I'm glad I brought my tripod with to enable me to shoot with a low ISO setting while still getting a clear picture. Some major changes I did in lightroom include bumping the shadow bar up to +100 to get rid of any shadows and then I moved the whites down to -90 to help clear up blown out areas since the sun was starting to shine. To further help in eliminating the blown out areas, I dropped the exposure down to about -55. One of the things I really like about this picture is how the stream runs into the frame. It does a good job of leading the viewer into the picture. I also like the yellow leaves on the ground as they add some color to the picture. Some of the trees are cut off, but I did my best to avoid cutting off the trees near their trunks. I think this makes the branches being cut off less distracting. The tree branch that spans across the stream also adds some character to the picture and makes the viewer spend some more time exploring the scene. 

Thursday, October 27, 2016

Hunters Moon

Image By: Daniel Kuske

This is my first blog post that involves a critique of one of my own pictures. This picture was taken in Bozeman. Known as the Hunters Moon, the moon on the morning this was taken was very large in the sky. It had a yellow-orange appearance. I like that the moon is close to the upper left corner. Also, I like the purple hue that was created on the horizon. The clouds also give the picture a lot of texture. At first I didn't like the fence posts, but I'm glad they are there because I think they give the picture more character and the repetition of them doesn't distract from the picture. I increased the shadows in the foreground to bring the attention to the moon. Finally, i wish the sky was a little more blue, but there is still enough color in the picture to make it visually appealing. 

Tuesday, October 25, 2016

Second Share 2 and Critique

 ISO 100
f / 22
1/30sec

ISO 100
f / 8.0
1/50sec

For my second share 2 and critique, the first photo is a sunrise by my house and the second picture is at Riverfront Park. All edits were done in Lightroom.

Thursday, October 20, 2016

Photo Critique

Photo By Julia Denning

I have yet to do a blog post on a critique of someone else's photo. This photo, called "Standing Watch," was one of the submissions of the 2015 National Geographic photo competitions. When I first looked at this photo, I immediately noticed the tree in the middle of the photograph. At first, I mistook this tree to be the subject of the photo. However, reading the caption for the photo made me realize the subject was intended to be the person standing near the tree, whom I failed to identify when first looking at the picture. I think this photo would be more powerful if the person happened to be wearing brighter clothing that stood out to enable him to be the first thing that is noticed. Besides that, I think this is a very good photo. I like how the sun is in the upper left third and just appears as a orange dot. Also, I think that the brief clearing of smoke in the middle adds an artistic touch to the photo. I also think that the shadowy foreground brings my attention up to the tree and person. Finally, I like that nothing is obviously split in half in the frame such as a tree or a bush. 

Thursday, October 6, 2016

Some tips on wildlife photography


Lately, I have become really interested in wildlife photography. Animals draw my attention more than landscapes. While reading an article by Melissa Groo, I learned several tips to improve my pictures of wildlife:
  • Wear quiet clothing
  • Wear camo gloves
  • Don't wear any reflective jewelry
  • Don't wear perfume or use scented detergent on your clothes
  • Remain in the shade as opposed to in the sun
  • Approach the animal from downwind
  • Move slowly
  • When the animal notices you, allow it to get used to you being there
  • When the animal drops its head, move towards it
  • When the animal raises its head, stop moving
  • Avoid eye contact
  • Approach the animal at an angle
  • Don't block the animal's escape route
This is just a brief summary of the tips that Melissa suggests, and I look forward to implementing them in the field.

Wednesday, September 28, 2016

Animals Can Be Silly Too

Image By: Mary Swaby

Apparently, comedy wildlife photography is a thing. There is even a contest called Comedy Wildlife Photography Awards where people submit photos of animals being silly. The rules are the following: if the animal makes a funny face or is just being funny, submit the picture for the contest. The contest also has a noble cause of encouraging people to make donations to the Born Free Foundation, which is a UK conservation group dedicated to saving wildlife around the world. Pictures on this article include a balancing puffin, laughing cheetah, a face-planting elephant, and much more. 

First Share 2 and Critique


Photos By Dan Kuske

The first picture is of ducks preening at the Shiloh conservation area. The second is a landscape photo taken at Riverfront Park near sunset. 

Thursday, September 22, 2016

The Northern Lights

Image: Frank Olsen

In Jamie Carter's "How to Photograph the Northern Lights," he gives 8 steps to enable anyone to take a good picture of the Northern Lights.
  1. Invest in a DSLR camera with a wide angle lens, take the shot with an aperature of f2.8 or less, and use a tripod. 
  2. If you are unsure whether the faint glow is a cloud or a borealis, taking a picture on your camera will help you to determine for sure. 
  3. Compose the photo of the Northern Lights with a good foreground. 
  4. Due to the surplus of Northern Lights photos, be creative when taking the picture. 
  5. Turn white balance to automatic, turn focus to infinity, use ISO 800-1600, and use a shutter speed of 4-25 seconds. 
  6. Shoot in RAW and don't up the saturation that much.
  7. Be prepared to be patient. Observing the Northern Lights is not a common occurrence.
  8. Instead of making the Northern Lights the goal of the trip, focus on the overall destination of where you go instead. 


Tuesday, September 20, 2016

Dominance Photos


Photos: Dan Kuske

For the first picture, I kept in mind the dominance rule that sharpness is more attractive than blur. Since the rabbit was running, I knew I had to have a fast shutter speed (1/200) to ensure that the picture wasn't blurry. For the second picture, I followed the dominance rule that states red is more attractive than yellow. 

Thursday, September 15, 2016

Astronomy Photography

Photo By: Scott Carnie-Bronca

When I came about this article, I instantly thought of when we talked about exposure time in class. The above picture was taken in Harrogate, South Australia. The lines that cut across the concentric circles created by the stars is the international space station. This photo reminds me of the picture taken by Dave Shumway that he showed the class one time. In Dave's picture, with an exposure time of several hours, the stars made concentric circles in the night sky with his tent in the foreground. In the article, there are several other photographs ranging from solar eclipses, northern lights, and the Milky Way Galaxy. 

Thursday, September 8, 2016

Animals and Coexistence

Photo By George Stoyle

This photo is one of many in Selina Chang's article, "Perfectly timed photos of wild animals offer a lesson in coexistance,"which was written for Quartz. In her article, she focuses on the beautiful moments in which animals interact with each other. In the above picture, several small fish are seeking shelter in the tentacles of this jellyfish. Other pictures include many action shots of predator going after and catching prey, human interaction with animals, and even a playful picture of a lion cub playing with a pangolin rolled up in its shell. These pictures make me realize that even brief moments can possess beauty; furthermore, the interaction between predator and prey doesn't have to be portrayed as brutal and bloody. 


Wednesday, September 7, 2016

Messing Around With Depth Of Field

Narrow Depth of Field

Wide Depth of Field

These are my first two pictures in this class. For the first picture, I used a narrow depth of field (F3.8). For the second, I used a wide depth of field (F13). 

Wednesday, August 31, 2016

Adventures In Alaska

 Photo By Ron Sanford

Photo By Matt Goddard

Photo By Eric Rock


I've always heard that the Alaskan wilderness is breathtaking. This Alaskan photography tour has many dates that range from the end of June to the beginning of September. The trip is 14 days long and has a price range from $11,595 to $12,095, which covers almost all trip costs. The maximum number of people allowed on each trip is 10. The complete day-to-day itinerary is listed on the website, but here are some highlights: traveling through Denali National Park, traveling on a private yacht in Kenai Fjords,  staying overnight on the private Fox Island, and taking photos of the bears at Brooks Falls.